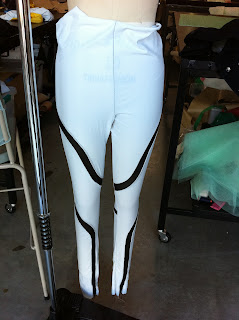
Each of the garments needed further resolving and Gillian was extremely helpful...
TIGHTS:
Fit- The fit of the tights through the leg was great, the style lines ran where i wanted them to. The fit at the waist was not great. My pattern i used as a block gathers into a covered elastic waistband. I don't particularly like the look of it- i want a clean finish instead. Gillian suggested two options:
1. Gather down the CF seam to (a) create a better fit around the waist, (b) drop the waist height and (c) repeat gather in the jackect
2. Modify the pattern to drop the waistline and create more fit by altering front and back seams and use an elsticated binding.
Sewing- We decided against twin needle topstitching a border to the mesh panels. While it would hold the seams away from the mesh, there was not real way follow the curves accurately using the machine we have. It was also decided that the CB seam on two of the panels were to be eliminated by cutting on the fold. The multiple seams on a curved panel were difficult to line up
.
LEOTARD:
FIT: The fit of the garment was good. The fit on the sleeve was a bit looser than i had expected but that makes it more UV resistant anyway. The leg hole line was more flattering on a real human (me) than on the dummy but Gillian was happy with it.
SEWING: Neckline and armholes ro be finished with binding. The side panels have a sharp corner turn that was difficult to sew flat and cleanly using an overlocker. To eliminate the problem the verticle styleline was lengthened to the leg line - creating a side panel under the mesh side panel. It would also mean another panel on which i can use my printed fabric.
VEST:
FIT: The armholes were way too saggy. I had twin needle topstitched them. Gillian suggested binding them to draw them up closer to the body. The other main fit concern was the overlay at the back. When I sewed up the hem the mahines, due to the extra layers of folded fabric, caused the hemline to stretch and buckle. You can see it in this photo:
Gillian suggested binding to fix the problem. I also thought lining the hood would also make it look a lot better. Seeing the seam in the hood i think cheapens it.
Tuesday, 25 October 2011
Week Eight: The Vest
The vest was probably the most interesting piece because it was a loose fitting garment in a stretch fabric and therefore, nothing would be hidden when it was worn (unlike the other pieces that stretch into place).
I took the unfitted jacket block, lowered the neckline and armholes (3cm) and marked out the panel lines. Cut them up and added seams. I then used the blocks again to create the free flowing overlays by marking out the style lines - slashing and spreading the front and adding a box pleat at centre back (this would later be my undoing!!)
I had never made ahood before and i never thought there would be so many ways to make it. I started with Armstrong but his 'simple' hood required 20 separate measurements and a degree in applied geometry to get a hood. So I turned to Aldrich instead. Good old Winnie had a mush easier approach:
I sewed it all up and this is what I got:
It was riddled with faults! No! Will talk to Gillian next week....
I took the unfitted jacket block, lowered the neckline and armholes (3cm) and marked out the panel lines. Cut them up and added seams. I then used the blocks again to create the free flowing overlays by marking out the style lines - slashing and spreading the front and adding a box pleat at centre back (this would later be my undoing!!)
I had never made ahood before and i never thought there would be so many ways to make it. I started with Armstrong but his 'simple' hood required 20 separate measurements and a degree in applied geometry to get a hood. So I turned to Aldrich instead. Good old Winnie had a mush easier approach:
I sewed it all up and this is what I got:
It was riddled with faults! No! Will talk to Gillian next week....
Week Seven and Eight: Design Class
The last two week we have been looking at logos, fonts and business cards.
For my label font I ended up chosing Quicksand- its clean, well rounded and stylish- what I would want my label to be.
Unsucessfully I toyed with having a plain black front with just my name on it with a colourful back with my melanocyte print and details on the back.
Instead, I found an art deco motif that i love in a picture of an old piece of clothing. I loved illustrator to trace and rework it to make an interesting motif: I played around with various layouts and came up with two that I liked (Front#1, Back then Front#2):
I chose a purple background because I love the colour. C:75 M:100 Y:0 K:72 gives a really deep,rich purple which i think I will use on my portfolio.
For my label font I ended up chosing Quicksand- its clean, well rounded and stylish- what I would want my label to be.
Unsucessfully I toyed with having a plain black front with just my name on it with a colourful back with my melanocyte print and details on the back.
Instead, I found an art deco motif that i love in a picture of an old piece of clothing. I loved illustrator to trace and rework it to make an interesting motif: I played around with various layouts and came up with two that I liked (Front#1, Back then Front#2):
I chose a purple background because I love the colour. C:75 M:100 Y:0 K:72 gives a really deep,rich purple which i think I will use on my portfolio.
Week Seven: Creating the Leotard
This weeks project was to create a leotard toile. First off I traced the paper pattern:
Once traced I marked out the style lines for the side panels and traced out the gathered overlay area:
For the gathered overlay, I slashed a spread by approx 2x and added seam allowacnces to give:
PROBLEM SOLVING: creating one side panel piece.
When i cut out my side panel pieces i couldn't just joined them together- there was definately fit within the side seam and the curves didn't line up without leaving gaps. So I called in the expert. Gillian showed me how in a few steps the fit can be transfered into the style lines from the side seams.
Firstly, trace the two pieces with side seams together. Then, using a careful eye, transfer the curves of the side seam to the straight style lines trying the eliminate the negative space caused by the two curves coming together. Gillian explained that when strteched on the body, the style lines will straighten out.
With a little sewing this is what I came up with:
Once traced I marked out the style lines for the side panels and traced out the gathered overlay area:
For the gathered overlay, I slashed a spread by approx 2x and added seam allowacnces to give:
PROBLEM SOLVING: creating one side panel piece.
When i cut out my side panel pieces i couldn't just joined them together- there was definately fit within the side seam and the curves didn't line up without leaving gaps. So I called in the expert. Gillian showed me how in a few steps the fit can be transfered into the style lines from the side seams.
Firstly, trace the two pieces with side seams together. Then, using a careful eye, transfer the curves of the side seam to the straight style lines trying the eliminate the negative space caused by the two curves coming together. Gillian explained that when strteched on the body, the style lines will straighten out.
With a little sewing this is what I came up with:
Week Five and Six: Design Class
Over the last two weeks we've been learning the basics of InDesign. Cas has been amazingly helpful (and enthusiastic!) and I wish we have had this classes in the first semester of first year. This knowledge of InDesign would have made every presentation I have given much stronger and would have definately helped when we were trying to create a brand/logo for our presentations to David Bush.
In the last two weeks we've learnt about BLEED and SLUG, KERNING (spacing between letters), Importing images and illustrations and the importance of PACKAGING file correctly, CMYK colour values and their importantance when printing, PRINTERS MARKS, PAGE NUMBERING, EXPORTING to pdf, how to put FILL TEXT into a document, how to set up a document, where of the net to find: FONTS, INSPIRATION and IDEAS.
Its been so, so, so helpful! Finally, I can make something look semi-professional!
In the last two weeks we've learnt about BLEED and SLUG, KERNING (spacing between letters), Importing images and illustrations and the importance of PACKAGING file correctly, CMYK colour values and their importantance when printing, PRINTERS MARKS, PAGE NUMBERING, EXPORTING to pdf, how to put FILL TEXT into a document, how to set up a document, where of the net to find: FONTS, INSPIRATION and IDEAS.
Its been so, so, so helpful! Finally, I can make something look semi-professional!
Week Six- Starting on the patterns.
This was the look chosen by the panel to create. I had wanted to do look #2 but they suggested i do this one because it meets the sunsafe brief a bit better. This leaves me to do the patterns of three pieces a leotard, tights and vest. All have mesh panels and I want to add panels with my print to inject a bit of colour.
Finding a Starting Point.....
I felt that using the swimsuit block QUT had provided as a starting point would require a fair amount of work to get the armhole, sleeve and neckline fit correct (and that's before even thinking about stlylines, panels and finishings!). So I decided to start with a long sleeved leotard block by Kwik Sew:
While I was at Spotlight picking up the leotard pattern I also saw this little gem (see below). Picked it up in case it proves helpful for the leggings:
Finding a Starting Point.....
I felt that using the swimsuit block QUT had provided as a starting point would require a fair amount of work to get the armhole, sleeve and neckline fit correct (and that's before even thinking about stlylines, panels and finishings!). So I decided to start with a long sleeved leotard block by Kwik Sew:
While I was at Spotlight picking up the leotard pattern I also saw this little gem (see below). Picked it up in case it proves helpful for the leggings:
This week I decided to make the toile for the leggings. My plan of action was in three easy steps:
STEP ONE: Cut out block in toile fabric and sew together.
STEP TWO: Mark style lines where thin mesh panels will go.
STEP THREE: Cut along those style lines to create the basis for the paper pattern pieces. Tranfer pattern shapes to paper and allow room for the width of the mesh panels and seam allowances (0.6cm)
What I came up with was this:
I experimented with top stitching along the borders of the mesh panels but the curves and the fact the machine foot can't be raised without cutting the thread off makes doing that neatly very difficult. Will talk to Gillian about this at design review.
Wednesday, 24 August 2011
Subscribe to:
Posts (Atom)